
To effectively manage your digital footprint and maintain control over your personal data, understanding how to hear and delete Amazon Alexa conversation recordings is absolutely crucial. Immediately, you can say, “Alexa, delete what I just said” or “Alexa, delete everything I said today” for quick voice command deletions. For more granular control, the Alexa app provides comprehensive tools to review, listen to, and selectively remove your voice history. In an era where voice assistants are central to many households, mastering these privacy controls is not just a convenience, but a fundamental aspect of safeguarding your personal information. This expert guide will meticulously walk you through every step, empowering you with the knowledge and tools to confidently manage your Alexa data.
The Imperative of Voice Data Privacy in the Age of AI
In our increasingly connected world, voice-activated assistants like Amazon Alexa have seamlessly integrated into daily life, offering convenience and automation at the sound of our voice. From playing music and setting alarms to controlling smart home devices and answering queries, Alexa has become an indispensable digital companion for millions. However, this convenience comes with a critical consideration: privacy. Every interaction with Alexa generates voice recordings, which are then stored and processed in the cloud. For many users, the concept of their conversations being recorded, even if only snippets, raises legitimate concerns about data security, personal privacy, and the potential misuse of sensitive information.
Amazon, like other voice assistant providers, collects these recordings primarily to improve the accuracy and functionality of its services. By analyzing voice commands, the AI system learns to better understand accents, intonations, and user preferences, thereby enhancing the overall user experience. While this intent is benign, the sheer volume and nature of the data collected necessitate that users have clear, accessible mechanisms for managing and, crucially, deleting their voice history. Understanding these mechanisms is not just about technical proficiency; it’s about asserting control over your digital identity and ensuring your personal space remains private.
Understanding How Alexa Records Your Voice
Before delving into the how-to, it’s important to grasp the fundamentals of how Alexa operates concerning voice recordings. Alexa devices are designed to continuously listen for a “wake word” (e.g., “Alexa,” “Echo,” “Computer,” “Amazon”). They do not, however, record or store everything they hear before the wake word is detected. Instead, a small buffer of audio is temporarily stored on the device. Once the wake word is recognized, the device begins recording and streams the audio to Amazon’s secure cloud servers for processing. This recording includes your command and potentially a few seconds before the wake word, which helps Alexa understand the context of your request.
These recordings are then analyzed by Amazon’s sophisticated AI algorithms to interpret your request and provide an appropriate response. The processed audio, along with the text transcription of your command, is stored in your Amazon account’s voice history. This storage serves multiple purposes: to allow you to review your interactions, to help Alexa learn your voice and preferences, and to contribute to the ongoing improvement of Alexa’s speech recognition and natural language understanding capabilities. Knowing this background empowers you to make informed decisions about managing your voice data.
How to Hear Your Amazon Alexa Conversations: A Comprehensive Guide
Accessing your voice history is the first step toward managing your Alexa data effectively. Whether you want to verify a command, check if a family member used the device, or simply audit your privacy, the Alexa app provides a straightforward pathway to review your past interactions.
1. Accessing Alexa Voice Recording History via the Alexa App
The Alexa app serves as the central hub for managing all aspects of your Alexa devices and data. Follow these detailed steps to navigate to your voice history:
- Step 1: Open the Alexa App
Launch the Amazon Alexa app on your smartphone or tablet. Ensure you are logged in with the Amazon account associated with your Alexa devices. - Step 2: Navigate to ‘More’
At the bottom navigation bar of the app, you will see several icons. Tap on the icon labeled “More” (it often looks like three horizontal lines or a hamburger menu icon). This opens a menu with various options. - Step 3: Select ‘Settings’
From the ‘More’ menu, scroll down and tap on “Settings.” This will take you to the main settings page for your Alexa account and devices. - Step 4: Choose ‘Alexa Privacy’
Within the ‘Settings’ menu, look for a section titled “Alexa Privacy.” Tap on this to access your privacy controls and data management options. This is a critical section for all your privacy-related needs. - Step 5: Select ‘Review Voice History’
Inside “Alexa Privacy,” you will find several options. Tap on “Review Voice History.” This action will load a list of all your recorded interactions with Alexa, displayed chronologically.
Upon entering the “Review Voice History” section, you’ll see a list of your interactions, each typically showing the date, time, and a text transcription of what Alexa heard, along with the device that captured the interaction. This interface is designed to give you a clear overview of your interactions.
2. Reviewing Specific Date Ranges or Filtered Recordings
For users with extensive Alexa histories, sifting through hundreds or thousands of recordings can be daunting. The Alexa app offers robust filtering options to help you pinpoint specific interactions:
- Step 1-4: (Same as above) Access ‘Review Voice History’
Follow the steps outlined above to navigate to “More” > “Settings” > “Alexa Privacy” > “Review Voice History.” - Step 5: Utilize the Drop-down Menu for Filtering
At the top of the “Review Voice History” screen, you’ll find a drop-down menu (often labeled “Filter by” or showing a date range like “Today”). Tap on this menu. - Step 6: Select Desired Date Range or Filter Options
From the drop-down, you can choose various pre-set date ranges (e.g., “Today,” “Yesterday,” “Last 7 days,” “Last 30 days,” “All History”). You may also find options to filter by specific Alexa devices linked to your account or even by individual Voice ID profiles if you have them set up. This is particularly useful in multi-user households to see who said what. - Step 7: Apply Filters and Review
After selecting your desired filters, the list of voice recordings will update to display only those interactions that match your criteria. This allows for a more focused review of your data.
These filtering capabilities are essential for efficiently managing your privacy, allowing you to quickly locate and address specific recordings without having to manually scroll through your entire history.
3. Listening to Individual Voice Recordings
Once you’ve located a specific interaction, you can listen to the actual audio recording to verify its content and accuracy. This can be particularly insightful if you suspect Alexa misinterpreted a command or if you want to recall the exact phrasing of a past request.
- Step 1-4: (Same as above) Access ‘Review Voice History’
Navigate to “More” > “Settings” > “Alexa Privacy” > “Review Voice History.” - Step 5: Select the Desired Voice Recording
Scroll through the filtered or unfiltered list of voice recordings until you find the specific interaction you wish to listen to. Tap on that entry. - Step 6: Tap the Play Button
Upon selecting an individual recording, you will typically see details about the interaction, including the text transcription, the device used, and the date/time. There will also be a prominent “Play” button (often a triangle icon). Tap this button to play the audio recording of your interaction with Alexa.
Listening to your recordings can provide clarity on how Alexa processes your commands and can be an invaluable tool for understanding and managing your privacy. It empowers you to verify what Amazon has recorded, ensuring transparency and control over your data.
How to Delete Your Amazon Alexa Conversations: A Step-by-Step Guide
The ability to delete your Alexa conversations is a cornerstone of privacy management. Amazon provides multiple avenues for deletion, from quick voice commands to detailed app-based management. Each method offers a different level of control and convenience.
1. Enabling and Using Voice Command Deletion
For immediate and convenient deletion, Alexa offers voice commands. However, this feature needs to be explicitly enabled for security reasons to prevent unauthorized deletions.
- Step 1: Open the Alexa App
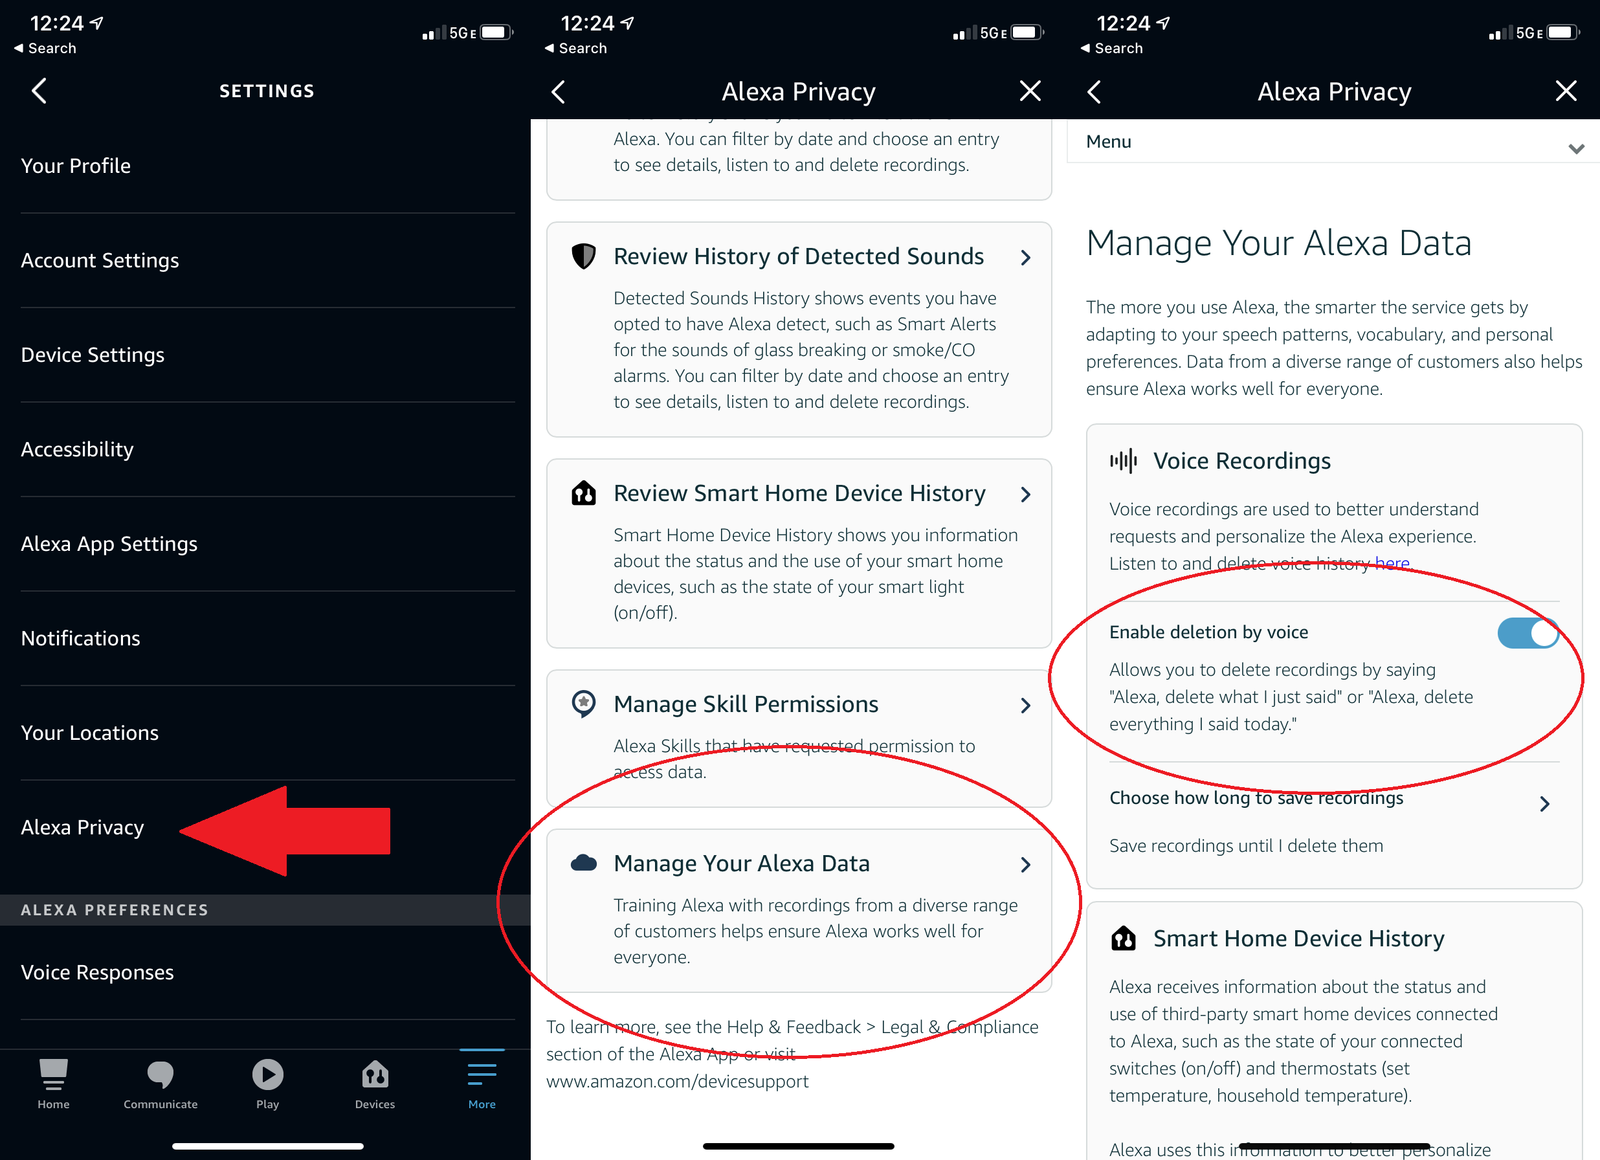
Launch the Amazon Alexa app on your device. - Step 2: Navigate to ‘More’ > ‘Settings’ > ‘Alexa Privacy’
Follow the familiar path to your privacy settings. - Step 3: Select ‘Manage Your Alexa Data’
Within the “Alexa Privacy” section, tap on “Manage Your Alexa Data.” This section provides overarching controls for how Amazon uses and retains your voice data. - Step 4: Enable ‘Enable Deletion by Voice’
Scroll down until you find the option labeled “Enable deletion by voice.” Toggle this option to the “On” position. - Step 5: Confirm the Action
A pop-up menu will appear asking you to confirm that you wish to enable this feature. Read the disclaimer and confirm to proceed. This ensures you understand the implications of allowing voice-activated deletion.
Once enabled, you can use the following voice commands:
- “Alexa, delete what I just said.”
This command will delete the last voice recording associated with your interaction. It’s ideal for quickly removing an accidental command or a sensitive utterance. - “Alexa, delete everything I said today.”
This command will remove all voice recordings from the current day. It’s a convenient option for clearing a day’s worth of interactions without going into the app. - “Alexa, delete all my recordings.”
This is the most comprehensive voice command, designed to delete all your voice recordings from Amazon’s servers. Alexa will typically ask for confirmation before proceeding with such a significant deletion. Use this command with caution, as it permanently removes your entire voice history.
While voice commands offer unparalleled convenience, it’s essential to ensure that only authorized users can issue these commands, especially “delete all my recordings.” The enablement process helps mitigate some risks, but awareness within the household is key.
2. Using the Alexa App to Delete Voice Recordings (Granular Control)
For more precise control, the Alexa app allows you to delete individual recordings, specific date ranges, or filter by device or voice ID.
- Step 1-4: Access ‘Review Voice History’
Open the Alexa app and navigate to “More” > “Settings” > “Alexa Privacy” > “Review Voice History.” - Step 5: Select Recordings for Deletion
You have several options here:- Deleting Individual Recordings: Scroll through the list and tap on a specific recording you wish to delete. On the detail screen for that recording, you’ll typically find a “Delete” button. Tap it and confirm.
- Deleting by Date Range or Filter: Use the drop-down menu at the top of the “Review Voice History” screen (as described in the “How to Hear” section) to select a date range (e.g., “Last 7 days”) or filter by a specific device. Once the filtered list appears, you’ll usually see an option to “Delete all recordings for this date range” or “Delete all recordings from this device.” Tap this option and confirm.
This method provides the most flexibility, allowing you to curate your voice history precisely according to your privacy preferences without having to delete everything.
3. Deleting All Voice Recordings (Complete History Eradication)
If you wish to wipe your entire Alexa voice history from Amazon’s servers, the app provides a clear path for this comprehensive deletion. This action is irreversible and should be undertaken with full understanding of its implications.
- Step 1-4: Access ‘Review Voice History’
Open the Alexa app and navigate to “More” > “Settings” > “Alexa Privacy” > “Review Voice History.” - Step 5: Select ‘Delete All Recordings’ Option
At the top of the “Review Voice History” screen, near the filtering options, you will typically find an option to “Delete All Recordings.” This might be presented as a button or a menu option. Tap on this. - Step 6: Confirm Permanent Deletion
A warning message will appear, explaining that this action is permanent and cannot be undone. It will also mention that deleting recordings may affect Alexa’s ability to recognize your voice or understand your requests as accurately. Read this carefully and, if you are certain, confirm the deletion.
Deleting all recordings ensures that Amazon no longer retains any of your past voice interactions. While it provides maximum privacy, it’s worth noting that Alexa may take some time to re-learn your voice and preferences from scratch.
4. What Happens After You Delete Your Recordings?
When you delete voice recordings, Amazon states that they are removed from their cloud servers. This means they will no longer be available for review in your Alexa app, nor will they be used by Amazon to improve their services or personalize your experience. However, it’s important to understand the nuances:
- Impact on Personalization: Deleting recordings, especially all of them, can reset some of Alexa’s learning about your voice and preferences. You might notice a temporary decrease in recognition accuracy or personalized responses.
- Data Retention Policies: While voice recordings are deleted, other data related to your interactions (e.g., the text transcription of a command, a record that an alarm was set) may still be retained in anonymized forms for service improvement or analytical purposes, separate from your personal voice history. Amazon’s privacy policy provides more detailed information on their data handling practices.
- No Recovery: Deleted recordings are generally not recoverable. Once confirmed, they are permanently removed from your accessible history.
Advanced Privacy Management and Best Practices for Alexa Users
Beyond simply hearing and deleting conversations, a holistic approach to Alexa privacy involves configuring various settings and adopting proactive habits. Taking these additional steps empowers you with greater control over your data and enhances your overall digital security.
1. Configuring Alexa Privacy Settings Beyond Voice Deletion
The “Alexa Privacy” section in the app is a treasure trove of settings that allow you to fine-tune how Amazon uses your data.
- Managing Your Alexa Data:
- Opt Out of Voice Recording for Product Improvement: Within “Alexa Privacy” > “Manage Your Alexa Data,” you’ll find an option to “Help Improve Alexa.” By default, Amazon uses your voice recordings to train and improve its speech recognition and natural language understanding technologies. You can toggle this setting off. While this might slightly slow down the pace of Alexa’s general improvements, it ensures your personal recordings are not used for this purpose.
- Enable/Disable Use of Messages to Improve Transcriptions: Similarly, you can control whether your messages (e.g., via Alexa Calling & Messaging) are used to improve transcription accuracy.
- Managing Permissions:
- Location Services: Review which devices have access to your location and for what purpose. Limiting location access can enhance privacy, though it may affect location-dependent features like weather or local search.
- Contacts: If you use Alexa for calling or messaging, you might have granted access to your phone’s contacts. Review and revoke this access if no longer needed.
- Smart Home Device Access: Understand what data your connected smart home devices share with Alexa and how it’s used.
- Voice Profile Management:
- If multiple people in your household have created voice profiles, you can manage or delete them under “Settings” > “Account Settings” > “Recognized Voices.” Deleting a voice profile removes Alexa’s ability to recognize that specific voice and personalize experiences for it.
- Kids’ Profiles and Privacy (Amazon Kids+):
- For households with children using Alexa devices (e.g., Echo Dot Kids Edition), Amazon Kids+ offers specific privacy controls. Parents can review and delete recordings made by children, set time limits, and manage content access directly through the Amazon Kids+ dashboard in the Alexa app. It’s crucial to regularly monitor these settings to ensure a safe and private experience for younger users.
2. Proactive Privacy Habits for Alexa Users
Beyond app settings, adopting certain habits can significantly enhance your privacy when interacting with Alexa.
- Regular Audits of Voice History: Make it a habit to periodically review your Alexa voice history (e.g., once a month). This allows you to catch any unintended recordings, review how Alexa is interpreting your commands, and ensure your data management settings are working as expected.
- Utilize the Microphone Mute Button: Every Alexa device comes with a physical microphone mute button. When this button is pressed, the device’s microphone is physically disconnected, and a red light typically illuminates. This is the most effective way to ensure Alexa is not listening or recording. Use it during sensitive conversations, private moments, or when you simply don’t want Alexa active.
- Strategic Device Placement: Consider where you place your Alexa devices. Avoid placing them in highly private areas like bedrooms or bathrooms if you are concerned about accidental recordings. Central living areas or kitchens might be more appropriate. Also, consider the acoustics of the room – loud background noise can sometimes trigger false wake words.
- Educate Household Members: If you live with family or housemates, ensure they understand how Alexa works, what is recorded, and how to use the privacy controls (especially the mute button and voice deletion commands). Clear communication can prevent many privacy mishaps.
- Strong Account Security: Your Alexa data is tied to your Amazon account. Ensure your Amazon account has a strong, unique password and, crucially, enable Two-Factor Authentication (2FA). This adds an extra layer of security, making it much harder for unauthorized individuals to access your account and, by extension, your Alexa data.
3. Understanding Amazon’s Data Retention Policies
While you can delete your voice recordings, it’s beneficial to have a general understanding of Amazon’s broader data retention policies. Amazon’s privacy policy states that they retain customer data for as long as necessary to provide services, for legal and regulatory compliance, and for internal business purposes. While voice recordings linked to your account are deleted upon your request, anonymized data (data that cannot be linked back to you) may be retained for research and development purposes. This distinction is important for a complete picture of data management.
The Broader Context: Voice AI, Privacy, and User Control
The conversation around how to hear and delete Amazon Alexa conversations is part of a larger, ongoing dialogue about privacy in the age of artificial intelligence. Voice assistants represent a profound shift in human-computer interaction, bringing AI directly into our homes and personal lives. This convenience, however, carries inherent ethical considerations regarding data collection, potential surveillance, and the implications of “always-on” devices.
As AI technologies advance, they become more sophisticated in interpreting human speech, intent, and even emotion. While this leads to more natural and helpful interactions, it also means that the data collected becomes richer and potentially more revealing. The ethical framework around voice AI is still evolving, grappling with questions of consent, data ownership, transparency in data usage, and the potential for bias in AI algorithms trained on vast datasets of human speech.
User empowerment is at the core of this discussion. Tools and guides like this one are vital because they place control back into the hands of the individual. By understanding how to manage their voice data, users can make informed choices about their privacy settings, decide what level of data sharing they are comfortable with, and actively participate in shaping the future of human-AI interaction. While companies like Amazon continually update their privacy features, the ultimate responsibility for data protection often falls to the user to leverage the available tools effectively.
Comparing Alexa’s privacy features to other voice assistants (like Google Assistant or Apple’s Siri) reveals a shared industry commitment to offering users control. While the specific menu paths and command phrases may differ, the core functionalities – reviewing history, deleting recordings, and managing privacy settings – are generally available across major platforms. This indicates a recognition within the tech industry of the importance of user trust and data sovereignty.
Troubleshooting Common Issues with Alexa Voice History
Even with clear instructions, users might encounter minor hiccups. Here are some common issues and their solutions:
- “Alexa isn’t deleting what I just said.”
- Check Voice Deletion Enablement: Ensure you have “Enable deletion by voice” turned on in “Alexa Privacy” > “Manage Your Alexa Data” in the app.
- Timing: The command “delete what I just said” typically refers to the very last interaction. If you’ve had other interactions since the one you want to delete, you might need to use the app for specific deletion.
- Internet Connection: Ensure your Alexa device and the app have a stable internet connection.
- “I can’t find certain recordings in my Voice History.”
- Correct Account: Make sure you’re logged into the correct Amazon account that owns the Alexa device.
- Filtering Issues: Double-check your date range and device filters in “Review Voice History.” You might be filtering out the recordings you’re looking for.
- Already Deleted: The recordings might have already been deleted, either by you or another household member.
- Wake Word Not Detected: If Alexa never detected a wake word, the conversation wouldn’t have been recorded in the first place.
- “What if I accidentally delete recordings?”
- Unfortunately, once voice recordings are deleted and confirmed, they are generally not recoverable by the user. Amazon’s system is designed for permanent deletion upon user request. This underscores the importance of exercising caution, especially when using “delete all my recordings” commands.
- “Alexa doesn’t seem to recognize my voice as well after deleting recordings.”
- This is a known, though often temporary, side effect of deleting extensive voice history. Alexa’s voice model for you is built on your past interactions. By deleting them, you’ve essentially removed some of its training data. Over time, as you continue to interact with Alexa, it will rebuild its understanding of your voice and speech patterns.
Conclusion
In the digital landscape of today, mastering how to hear and delete Amazon Alexa conversation recordings is an indispensable skill for maintaining your privacy and control. From the immediate convenience of voice commands like “Alexa, delete what I just said” to the granular precision offered by the Alexa app for reviewing and selectively removing interactions, you are equipped with powerful tools to manage your voice data. Beyond simple deletion, understanding Alexa’s recording mechanisms, proactively configuring privacy settings, and adopting smart usage habits collectively form a robust defense for your digital footprint.
As voice AI continues to evolve, the onus remains on users to stay informed and actively engage with the privacy features provided. By taking control of your Alexa history, you not only safeguard your personal information but also contribute to a more transparent and user-empowered future for voice technology. Your voice, your data, your choice – ensure you exercise it wisely.
Frequently Asked Questions (FAQs)
Q1: Does Alexa record everything I say?
A: No, Alexa devices are designed to continuously listen for a “wake word” (e.g., “Alexa”). They only begin recording and sending audio to Amazon’s cloud servers after the wake word is detected. A small buffer of audio may be temporarily stored on the device before the wake word, but it’s not typically recorded or stored in your voice history unless the wake word is recognized.
Q2: How often should I review and delete my Alexa voice history?
A: The frequency depends on your personal comfort level and usage. For heightened privacy, consider reviewing your voice history monthly or quarterly. If you use Alexa extensively or have sensitive conversations around the device, you might opt for more frequent deletions using voice commands like “Alexa, delete everything I said today.”
Q3: Will deleting my voice recordings affect Alexa’s performance or my personalized experience?
A: Deleting your voice recordings, especially a large portion of them, can temporarily impact Alexa’s ability to recognize your voice or understand your specific requests as accurately. This is because Alexa learns from your interactions. However, over time, as you continue to use Alexa, it will rebuild its understanding of your voice and preferences. For most users, any impact is minimal and short-lived.
Q4: Can other people in my household delete my Alexa recordings?
A: If other household members have access to the Alexa app logged into your Amazon account, or if “Enable deletion by voice” is turned on and they know the commands, they could potentially delete your recordings. It’s crucial to manage app access, educate household members about privacy controls, and consider using Voice ID to differentiate users and manage specific voice profiles.
Q5: Is there a way to prevent Alexa from recording my voice at all?
A: Yes, the most effective way to prevent Alexa from recording your voice is to use the physical microphone mute button on your Alexa device. When pressed, the microphone is physically disconnected, and a red light typically indicates that it’s muted. This ensures no audio is being sent to Amazon’s servers until you unmute it.